Two months ago, I was temporarily insane and agreed to letting my teen-aged daughter have a slumber party for her birthday. Not only did I agree to the sleepover, but told her I would make all the party favors and goodies. The goal was for the party to be fun, but also budget-friendly. She agreed to help, so we plunged head-first into party-planning mode.
First, we needed a theme. We decided on a spa party, or as I like to call it, a spaaaahhhh party. I’m cool like that.
After searching for invitations and finding nothing ready-made that she liked, she decided to make her own. As a friend said, “That apple didn’t fall far from the tree.” Using blank notecards, pre-cut tags and a rubber stamp, she created a very spa-like invitation with a little bling, of course.
For years, I’ve been telling anyone who will listen that I need a clone. In a perfectly cloned life, I’m showering my family with love and affection and the other woman house cleaning. So, if anyone reading this is in need of a test subject, I’m your gal!
My problem isn’t unique. Moms all over the world have to balance out the wants and needs of their families while keeping themselves in balance because if Momma’s not happy, nobody’s happy.
In order to keep my balance and find rest for myself, I must sometimes force it. One way I keep my balance, literally, is through yoga. Another way to give my body rest when I’ve been running for everyone else, is to crochet. It forces me off my feet and my perpetually busy mind is calmed through the repetitive motion of hooking yarn.
One of my favorite things to crochet are dishcloths. Quirky, I know, but follow me. I have my reasons.
They work up quickly and can be finished in one sitting, thereby providing immediate gratification. Results, people!
They are functional. Everyone must was dishes.
And in the case of this sushi dishcloth, they are kitschy and cute!
Work up a few dishcloths with this free crochet pattern and give a little sushi love. Who doesn’t love kitschy kitchen crochet thingys?
Last year, about this time of year, I wrote about our clothes dryer kicking the bucket and building a solar clothes dryer out of necessity. Because we live in the country with horses for neighbors, we can hang out our laundry with reckless abandon. The horses don’t judge us when they see our laundry hanging on the line. At least not that we know. You never can tell with horses.
Because we get much use from our clothesline, our clothespin bag has seen better days. Much better days.
While perusing the yarn aisle at my local craft store, I happened upon a free crochet pattern for a cupcake dishcloth. The sign said “Take One”, so I did, because I always do what I’m told. Yep.
Then I got home and promptly put it away and completely forgot about it until a few weeks ago when I woke up with an excruciating pain in my foot. The first step out of bed and a severe pain in my foot told me I wasn’t going anywhere.
Because I have a difficult time not doing anything, I shuffled and crawled over to the yarn bag and came across this pattern by Twinkie Chan. I grabbed my yarn and went to work
I think the name Twinkie Chan is partly why I decided to work up the pattern. With a name like that, surely it would be cute!
My world has been rocked. It has occurred to me that I need to change the names of all my kids.
Originally, I started this blog with College Bee, Teen Bee, Tween Bee and Baby Honeybee. Now it all must change. You see, College Bee graduated and landed a great job in a fun city and moved out. I don’t what to call him anymore.
Teen Bee is now a in his final year of homeschool and it taking dual-credit classed at our local community college. Should his name be College Bee now?
Tween Bee is the one that is most rocking my world right now. She just turned thirteen. Since she is my oldest daughter, this is the first time to cohabit with a teen-aged girl. I’m not sure how we can both survive this.
Finally, Baby Honeybee isn’t really a baby anymore. She wasn’t even when I started this blog, but she’s my baby and always will be, so Baby Honeybee remains Baby Honeybee and that’s final.
Now that I’ve muddied the waters in regards to my growing children and the names by which they are known, let’s move along to the real reason for this post.
Chalk paint.
Specifically, a DIY recipe for chalk paint.
With all these kids wrecking my house on a daily basis (homeschooling is hard on a house, folks!), I needed an easy way to revitalize my home without spending much money. In perfect timing, my awesome sister-in-law passed along her childhood furniture to my girls.
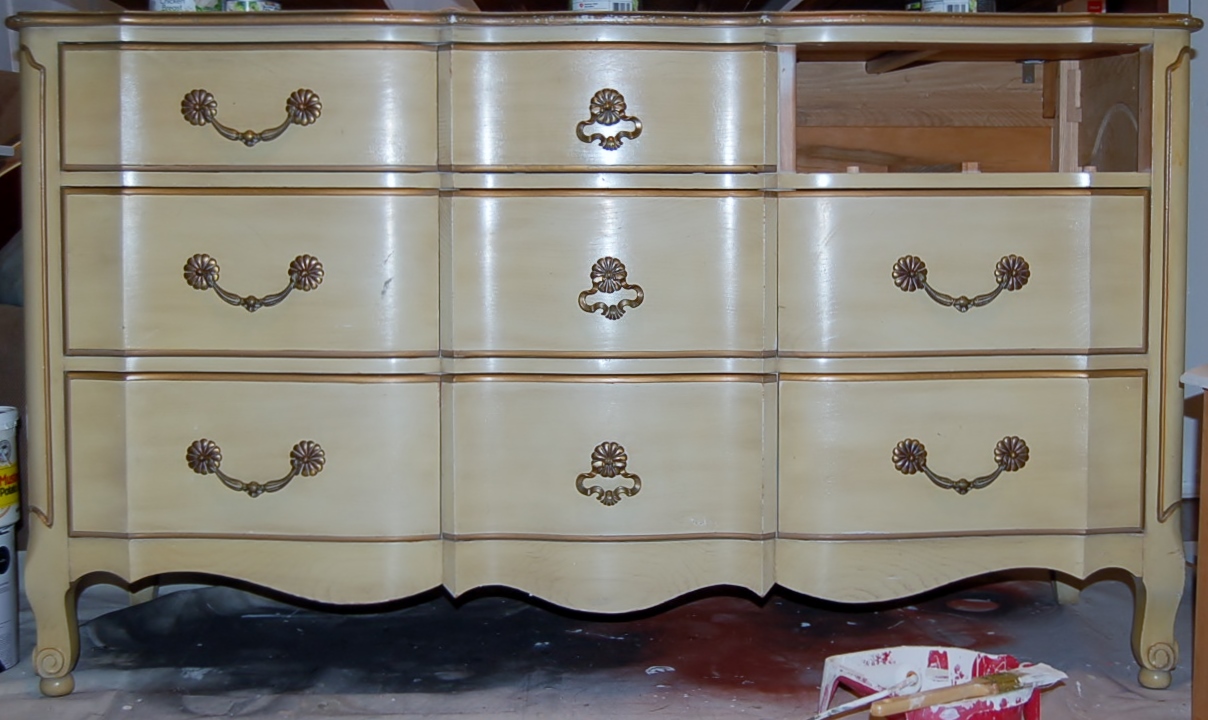
Enter this dresser.
It really isn’t missing a drawer. I just forgot to get a BEFORE photo. I’m a dork.
After seeing on Pinterest all the colorful ways people have revamped this style of dresser, I opted for a more classic approach. After all, we know from the intro of this post, these kids aren’t staying the same age, no matter how hard I try to keep them small. Sure the aqua dresser would be cool now, but what about in five years when their tastes change, or in five minutes when they change their favorite color. It happens.
So, I went with white. But, with a twist. The top is stained dark brown and slightly distressed. I figured I would get a head start on the wear so when they girls scratched and dinged the furniture it might look intentional and I might not let it bother me as much as if it were perfect. That was a very long sentence and probably grammatically incorrect, but I don’t care. What I’m trying to say is, if you can’t beat ’em, join ’em.
Onto the extremely easy chalk paint recipe:
1/4 cup Plaster of Paris
1/4 cup water
1 cup latex paint
I used a fine mesh sieve to make sure the plaster of Paris was free from any lumps. This made a big difference in the end result, so I would recommend it.
Add the water to the plaster of Paris and stir thoroughly to combine.
Add this mixture to 1 cup of latex paint. Stir to combine. The paint will begin to thicken. If you prefer a thinner consistency, add more paint.
This recipe is very forgiving and the amounts don’t have to be exact, but this is the recipe I found I liked best.
Before I began painting, I had already stripped and sanded the top and applied 2 coats of Minwax gel stain in Hickory. I forgot to take a picture of the stained top, so let’s pretend this beautifully sanded dresser top has a dark hickory stain. Thank you .
To work the chalk paint into the details and crevices, I used a 1.5″ sash brush then I rolled over the whole area with a foam roller for a smooth finish. The beauty of chalk paint is that it dries quickly if applied thinly, so after I completed one coat I was able to begin the next within a few minutes. Overall the dresser took 4 coats of paint.
I let the final coat dry overnight before sanding. I used a fine grit sanding block to lightly sand the whole dresser. I first sanded the dark top and hit the high spots to reveal bare wood to bring out the details. Then I flipped over the sanding block to a clean side and sanded the body and drawers.
After sanding, I thoroughly wiped down the entire dresser and drawers with a damp cloth.
For the finish, I used a paste wax. for the top, I mixed a small amount of gel stain into the clear wax. I wanted to lessen the contrast between the stain and the areas I sanded to reveal bare wood. For the white areas, I used the clear wax straight from the can.
I applied the dark wax with a piece of cotton t-shirt material. After the wax began to look hazy, I used a clean rag to buff to a shine.
Since the body of the dresser has several recessed areas, I applied the wax using an angled, round fitch brush. I found mine at Home Depot for about 8 bucks near the Ralph Lauren paint display with their faux finish paint tools.
After the first coat of wax was applied, I used a mushroom buffer by Ryobi that I attached to a drill. You can buff by hand, but this attachment made quick work of getting into the crevices.
Finally, because I wanted a slightly warmer tone to the dresser, I took the same dark wax I made for the top and wiped it all over the dresser, concentrating on the recessed areas. I worked quickly, not letting the wax dry. I buffed the dark wax into the paint, wiping off as much as possible. I didn’t want the dresser to look dirty or too old, as the teen-aged girl child would have definitely given me grief about that. She’s a little opinionated.
Psst…..yes, you. Do you need a quick gift because you don’t have your act together and you don’t have a gift for your sweet Aunt’s birthday? For those of you who said “yes”, stop talking to your computer. You will look a bit off your rocker to those who are blessed to be in your presence.
I’m not judging.
But if you need a gift in a hurry, for whatever reason, these are quick and easy. And pretty cute, if you ask me. But you didn’t.
A few, plain wooden spoons and a wood burning tool is all you need.
And a pencil.
Plain wooden spoons, a wood burning tool and pencil are all you need.
(Is this post reminding you of The Jerk, yet?)
You’ll need some food-grade mineral oil if you want to seal them. It’s optional, but I opted for it.
Plain wooden spoons, a wood burning tool, a pencil and mineral oil. That’s really all you need.
Lightly trace out your design on the spoons with a pencil.
Use the wood burning tool to go over the pencil lines. You can shade areas at this point. When finished, rub food-grade mineral oil into the wood and wipe off.
after oiling
That’s all there is to it!
This is a set I made for my mom for Mother’s Day last year. I didn’t have my act together then either. No surprise there.
Psst…..yes, you. Do you need a quick gift because you don’t have your act together and you don’t have a gift for your sweet Aunt’s birthday? For those of you who said “yes”, stop talking to your computer. You will look a bit off your rocker to those who are blessed to be in your presence.
I’m not judging.
But if you need a gift in a hurry, for whatever reason, these are quick and easy. And pretty cute, if you ask me. But you didn’t.
To make your own wood burned spoons, a few plain wooden spoons and a wood burning tool is all you need.
And a pencil.
Plain wooden spoons, a wood burning tool and pencil are all you need.
(Is this post reminding you of The Jerk, yet?)
You’ll need some food-grade mineral oil if you want to seal them. It’s optional, but I opted for it.
Plain wooden spoons, a wood burning tool, a pencil and mineral oil. That’s really all you need.
Lightly trace out your design on the spoons with a pencil.
Use the wood burning tool to go over the pencil lines. You can shade areas at this point. When finished, rub food-grade mineral oil into the wood and wipe off.
after oiling
That’s all there is to it!
This is a set I made for my mom for Mother’s Day last year. I didn’t have my act together then either. No surprise there.
I’m going to watch The Jerk now.
Check out other great ideas at the Artsy Fartsy and Your Turn to Shine Link Parties!
When I tell people I make my own soap, I’m sure many of them think it’s a waste of time. After all, soap is readily available in just about every grocery, drug, convenience and dollar store and it’s inexpensive. So why do I make my own? I’m glad you asked.
Your skin is your largest organ. Some adults carry around 8 pounds or about 22 square feet of it. While it does a good job at regulating temperatures and keeping our insides on the inside, it’s porous, and that means it is penetrable. Some of the stuff we put on the surface of our skin can make it’s way into our bodies. If you are not convinced, think about the medication patch delivery system.
Because my girls suffer from food allergies and psoriasis, we spend more time than I would like traveling to and fro and sitting in the office of our allergist. On his advice, we have been removing fragrances from the cleaning, laundry and toiletry supplies we use. We have completely omitted dryer sheets (replaced with dryer balls) and said sayonara to store-bought liquid fabric softener in favor of homemade fabric softener and cleaning concentrate. Our cleaning supplies are baking soda, vinegar and a few essential oils like tea tree and eucalyptus. When extra cleaning power is needed, I break out the big guns like borax and washing soda.
Now, back to why I make my own soap. I don’t know what is in the mass-produced soap. The “fragrance” on the list of ingredients doesn’t have to be disclosed. It can be a dangerous cocktail of chemicals that have been linked to cancer and phthalates that can lead to asthma and allergies. Not in my bath water. No thanks.
If you are a homeschooling family, like we are, a lesson in soap-making is a great way to connect chemistry and real life. Do a unit study of organic chemistry and make something useful in the process. Embrace your inner geek! We all have one!
There are other goat’s milk soaps on the market that are safe and lovely, but at 5-6 dollars a bar, it’s not doable for my family of six.
So that’s why I make my own soap. I get to design the soap with the cleansing, lathering and moisturizing properties I want. Fragrance and color can be added by using essential oils and natural pigments. Although, my favorite unscented “scent” comes naturally from goat’s milk and honey.
Here’s how it came to be.
A few years ago, I made my very first batch of cold-process soap. It was unscented and made with goat’s milk. It was mild and even though it did not contain any added fragrance, it smelled heavenly. There is something about the scent of goat’s milk when it “cooks” in the soap that I find irresistible. If you don’t have any idea what I mean, then you need this soap in your life!
Today, because I needed mild soap and didn’t want to wait, I made that same goat’s milk soap by the hot process method. This is the first time I have used this method and I have to say, I’m a convert. You see, with the cold process method the bars require a curing period to make sure that the oils are completely saponified and the lye is no longer present. The curing period can last for several weeks and is difficult if you want it now! With the hot process method, the lye “cooks” away in the crock pot (yes, you can make soap in the crock pot!) and the soap is ready to use in as little as 12 hours.
I want my soap now! My winter-ravaged skin needs it. I’ll bet many of you feel the same way, so I’ll tell you how I did it!
You will need:
a kitchen scale that measures ounces or grams
safety goggles
gloves
face mask
spoon for stirring
glass container for mixing milk and lye
crock pot
olive oil (22.4 ounces or 635.029 grams)
coconut oil (8.96 ounces or 254.012 grams)
castor oil (0.64 ounces or 18.144 grams)
goat’s milk (12.16 ounces or 344.73 grams)
honey (2 Tbsp)
lye (4.521 ounces or 128.158 grams)
pH strips (or phenolphthalein )
You also need 2 Pringles cans to use as molds (my kids thought I was the bees knees for buying Pringles) or a soap mold that accommodates 2 pounds of soap.
Warning: Lye is a caustic substance. Failure to follow safety precautions and to wear proper safety gear can result in injury.
This recipe is for two pounds of soap. It fills two Pringles cans about 3/4 of the way. It’s important to note that Pringles can may only be used during the hot-process soap method because the soap being put into the cans is already soap. Do not use Pringles cans with cold-process soap as it still contains lye until it is cured.
Safety first: If you make any changes to the oils, run your oils of choice through a soap calculator. SoapCalc.net is the one I used.
When using goat’s milk or any other milk in soap making, it must be ice cold to keep the sugars from caramelizing too much and creating an off-putting scent. On the morning I make soap, I measure out the amount of milk needed for the recipe into a container and place it in the freezer. Within a couple of hours, the milk is slushy and ready for the lye.
weighed oils into crock pot
Weigh each oil and place in the crock pot on low. While the oils are melting, measure out your lye (I used a disposable paper cup). Be sure to wear your safety goggles, mask and gloves when handling lye.
Turn off the crock pot when the oils have melted.
Transfer your slushy goat’s milk into a large glass measuring cup, or pitcher. Wearing all you safety gear (long sleeves are a good idea here, too) sprinkle the lye slowly into the milk and stir gently until completely dissolved. I add the lye to the liquid outside to avoid breathing in any fumes. I recommend doing this. Always.
Safety note: (This post is full of them!) Never pour your liquids into the lye. It can make a very dangerous volcano-like situation.
Once the lye is fully dissolved in the milk, slowly pour into the oils. Stir gently with a spoon to mix, then break out the stick blender! I wouldn’t think of making soap without one. I’m pretty sure by the time I stirred the oil/milk/lye mixture to trace, my arms would fall off. I’m pretty attached to my arms, so I use a stick blender. You should, too.
With the stick blender, immersion blender or whatever you want to call it (call it Hank, if you want) blend until the mixture looks like a soft-set pudding. This is called “trace” because your blender (or Hank) will leave a trace of a trail when pulled through the mixture. This stage usually takes 8-12 minutes, depending on the oils being used.
When trace happens, turn on the crock pot to low and cover with the lid. I offset the lid slightly so the heat stays in, but the lid does cause condensation.
As the soap cooks, it will bubble along the edges. Stir with a spoon occasionally to keep the mixture cooking evenly. While cooking, the soap mixture looks like applesauce. Resist the temptation to taste it. When the soap is ready, it will resemble waxy mashed potatoes. At this point, use a pH test strip to make sure the lye is cooked out. Remove a small blob of soap mixture and test it with your pH strips or phenolphthalein, whichever one you’re using. Your goal is a pH of 8.2-10. Some soap makers use the zap test. If lye is still present, the soap will zap your tongue like a 9-volt battery. When the soap is fully cooked, it just tastes like soap. Using pH strips or phenolphthalein is more accurate and the recommended way to go. Do that.
This recipe took about an hour and 15 minutes to cook.
When you have determined that your soap is fully cooked, turn off the crock pot and add the honey.
Stir until the honey is fully incorporated. If using any other additives, such as coloring or essential oils, add them at this point.
Spoon the mixture into the Pringles cans. (You do not need to line them with parchment or freezer paper. Beautiful, isn’t it?) Work quickly and tap the cans on the counter occasionally to avoid air bubbles. Fill the cans no more than 3/4 of the way. You need a little space to cut and tear the can away when the soap has hardened.
The soap needs at least 12 hours to cool and harden in the molds. When ready to unmold, take a sharp knife and cut straight down and then tear the can off the rest of the way. Slice into bars.
Congratulations! You made soap!
I usually let my bars sit on a wire rack to continue to harden after I cut them into bars. By allowing them to dry out, they last longer in the shower.
This recipe yields 12-14 bars (3/4″-1″ in thickness).
As soon as I force more Pringles on my kids and the youth group (or I make my own wooden soap mold), I’ll be making more soap in the crock pot. I’m see Lime-Basil or Lavender-Mint in my near future!
What about you? I’m curious. What is your favorite soap scent?
(I am also curious how many people have the urge to watch “Fight Club” after making soap. Is it just me? Please tell me I’m not alone.)
Now that I have shared with you what I use for fabric softener, I’ll reveal what I use in place of dryer sheets!
You are all on the edge of your seats, I know.
It’s dryer balls!
Dryer balls fluff laundry as it tumble dries, reducing drying time and making your clothes feel soft and fluffy without leaving a skin-irritating film on your clothes. You may have heard a tip to toss tennis balls into the dryer or you may have seen dryer balls made from rubbery plastic sold in stores. I prefer to avoid the chemicals in tennis balls and plastic can release dangerous compound when heated. Neither of these thrill me so I made some using wool yarn!
These are exciting times, man! Ditch the Downy habit! You can do it!
I seem very excited today. It might be the mood-enhancing essential oils, or that I just love a good DIY project. Especially one that is as simple as this one is. Top it off with not spending four bucks for a box of dryer sheets and I’m downright giddy!
Here’s what you need:
100% wool yarn
crochet hook
pantyhose
If you have wool yarn leftover from the scarf you knitted Aunt Suzy, now is the time to gather up all your scraps. The only catch is, it must be 100% wool yarn. No substitutes. Sorry, on this I must be a stickler. The point is, we will wash and dry and agitate the heck out of these wool fibers to make them lock together and become one with each other. This beautiful process is also known as felting. It’s what happens when you don’t pay attention to garment care instructions and put the lovely sweater you received as a Christmas gift through the washer and dryer only to realize your mistake when you pull out what looks to be a doll sweater. Then you look around with a puzzled expression wondering how a doll sweater made its way into your load of laundry until the sweater begins to look vaguely familiar and it hits you what you have done.
Breathe.
Moving along.
Take your yarn and wind it into a tight ball about the size of a baseball. You can go with tennis ball size or even softball if that’s your game, but I did baseball size and it seems to work just fine.
tuck your tail
When you have the size you prefer, pull the tail through many layers using a crochet hook. Tuck the tail deep into the ball to completely secure.
You can make as many as you would like. Three seemed like a good number to me because I ran out of yarn after the third one. Three was meant to be.
Now, raid your drawer for some pantyhose. I happened to have a perfectly good pair of suntan colored hosiery hanging around for more than a decade because I’m too pasty to pull off “suntan” without looking like I’m part oompa loompa and also, I despise wearing pantyhose. Use whatever you have, folks!
Cut a leg off the pantyhose and shove one ball into the foot. Tie and knot and put in the next ball. Keep going until all your yarn ball are in the hose with knots in between and at the end.
Now it’s time to wash a load of laundry. This just keeps getting better, doesn’t it? Towels or sheets are good choices because you want to wash this load on HOT and EXTRA HEAVY or whatever cycle is the most brutal on your washing machine.
After washing, throw the load of laundry into the dryer, yarn balls and all. Don’t take them out of the pantyhose just yet. Use the highest heat setting o your dryer.
When the drying cycle is complete, snip away the pantyhose from the yarn balls.
We are almost there!
Take your essential oils of choice. Lavender lemon is lovely, but you can do whatever you want. I’m flexible. If you are having a difficult time deciding which oils to use, this chart may help.
Apply 10-20 drops on each ball, until desired strength is achieved. This may take a few tries to get it right. I have noticed that 20 drops per ball is enough to leave a pleasant scent in the dry laundry.
Now they are ready to use!
We are a family of six, so laundry is an everyday occurrence. When not in use, I just leave the balls in the dryer. If you prefer to contain the scent longer, store them in a glass jar with a lid until ready to use.
If you’re anything like me, you will toss these into the dryer with your wet laundry and immediately reach up to grab a dryer sheet. Talk about a habit!
It’s that time of year again. Time to welcome spring with a frenzy of cleaning. Today I’m sharing one of my oldies, but goodies just in case you missed it the first time around.
Previously, I shared with you what I use for fabric softener. Now I’ll reveal what I use in place of dryer sheets!
You are all on the edge of your seats, I know.
It’s dryer balls!
Dryer balls fluff laundry as it tumble dries, reducing drying time and making your clothes feel soft and fluffy without leaving a skin-irritating film on your clothes. You may have heard a tip to toss tennis balls into the dryer or you may have seen dryer balls made from rubbery plastic sold in stores. I prefer to avoid the chemicals in tennis balls and plastic can release dangerous compound when heated. Neither of these thrill me so I made some using wool yarn!
These are exciting times, man! Ditch the Downy habit! You can do it!
I seem very excited today. It might be the mood-enhancing essential oils, or that I just love a good DIY project. Especially one that is as simple as this one is. Top it off with not spending four bucks for a box of dryer sheets and I’m downright giddy!
Wool Dryer Balls DIY
100% wool yarn
crochet hook
pantyhose
If you have wool yarn leftover from the scarf you knitted Aunt Suzy, now is the time to gather up all your scraps. The only catch is, it must be 100% wool yarn. No substitutes. Sorry, on this I must be a stickler. The point is, we will wash and dry and agitate the heck out of these wool fibers to make them lock together and become one with each other. This beautiful process is also known as felting. It’s what happens when you don’t pay attention to garment care instructions and put the lovely sweater you received as a Christmas gift through the washer and dryer only to realize your mistake when you pull out what looks to be a doll sweater. Then you look around with a puzzled expression wondering how a doll sweater made its way into your load of laundry until the sweater begins to look vaguely familiar and it hits you what you have done.
Breathe.
Moving along.
Take your yarn and wind it into a tight ball about the size of a baseball. You can go with tennis ball size or even softball if that’s your game, but I did baseball size and it seems to work just fine.
tuck your tail
When you have the size you prefer, pull the tail through many layers using a crochet hook. Tuck the tail deep into the ball to completely secure.
You can make as many as you would like. Three seemed like a good number to me because I ran out of yarn after the third one. Three was meant to be.
Now, raid your drawer for some pantyhose. I happened to have a perfectly good pair of suntan colored hosiery hanging around for more than a decade because I’m too pasty to pull off “suntan” without looking like I’m part oompa loompa and also, I despise wearing pantyhose. Use whatever you have, folks!
Cut a leg off the pantyhose and shove one ball into the foot. Tie and knot and put in the next ball. Keep going until all your yarn ball are in the hose with knots in between and at the end. When finished, you have dryer ball sausage links.
Now it’s time to wash a load of laundry. This just keeps getting better, doesn’t it? Towels or sheets are good choices because you want to wash this load on HOT and EXTRA HEAVY or whatever cycle is the most brutal on your washing machine.
After washing, throw the load of laundry into the dryer, yarn balls and all. Don’t take them out of the pantyhose just yet. Use the highest heat setting o your dryer.
When the drying cycle is complete, snip away the pantyhose from the yarn balls.
We are almost there!
Take your essential oils of choice. Lavender lemon is lovely, but you can do whatever you want. I’m flexible. If you are having a difficult time deciding which oils to use, this chart may help.
Apply 10-20 drops on each ball, until desired strength is achieved. This may take a few tries to get it right. I have noticed that 20 drops per ball is enough to leave a pleasant scent in the dry laundry.
Now they are ready to use!
We are a family of five. Hubby is an archaeologist and I have a gardening habit, so laundry is an everyday occurrence. I like the idea of fresh, clean laundry without using synthetic chemicals. When not in use, I just leave the balls in the dryer. If you prefer to contain the scent longer, store them in a glass jar with a lid until ready to use.
If you’re anything like me, you will toss these into the dryer with your wet laundry and immediately reach up to grab a dryer sheet. Talk about a habit!
Check out The Art of Home-Making Monday Link Party!